DIY - Tutorials, Expertise, Make-up
Tutorial: The perfect eyeliner
Nov
One of the most common questions I get is: "How do I get the perfect eyeliner? Help!" That's why I've put together a little roadmap for all eyeliner types and shapes.
At the very beginning, there is the question of which brush is best to use and what kind of eyeliner you want to conjure up - because the possibilities are endless! There are fine eyeliner brushes, angled brushes, wide brushes and detail brushes that can also be used for eyeliner.
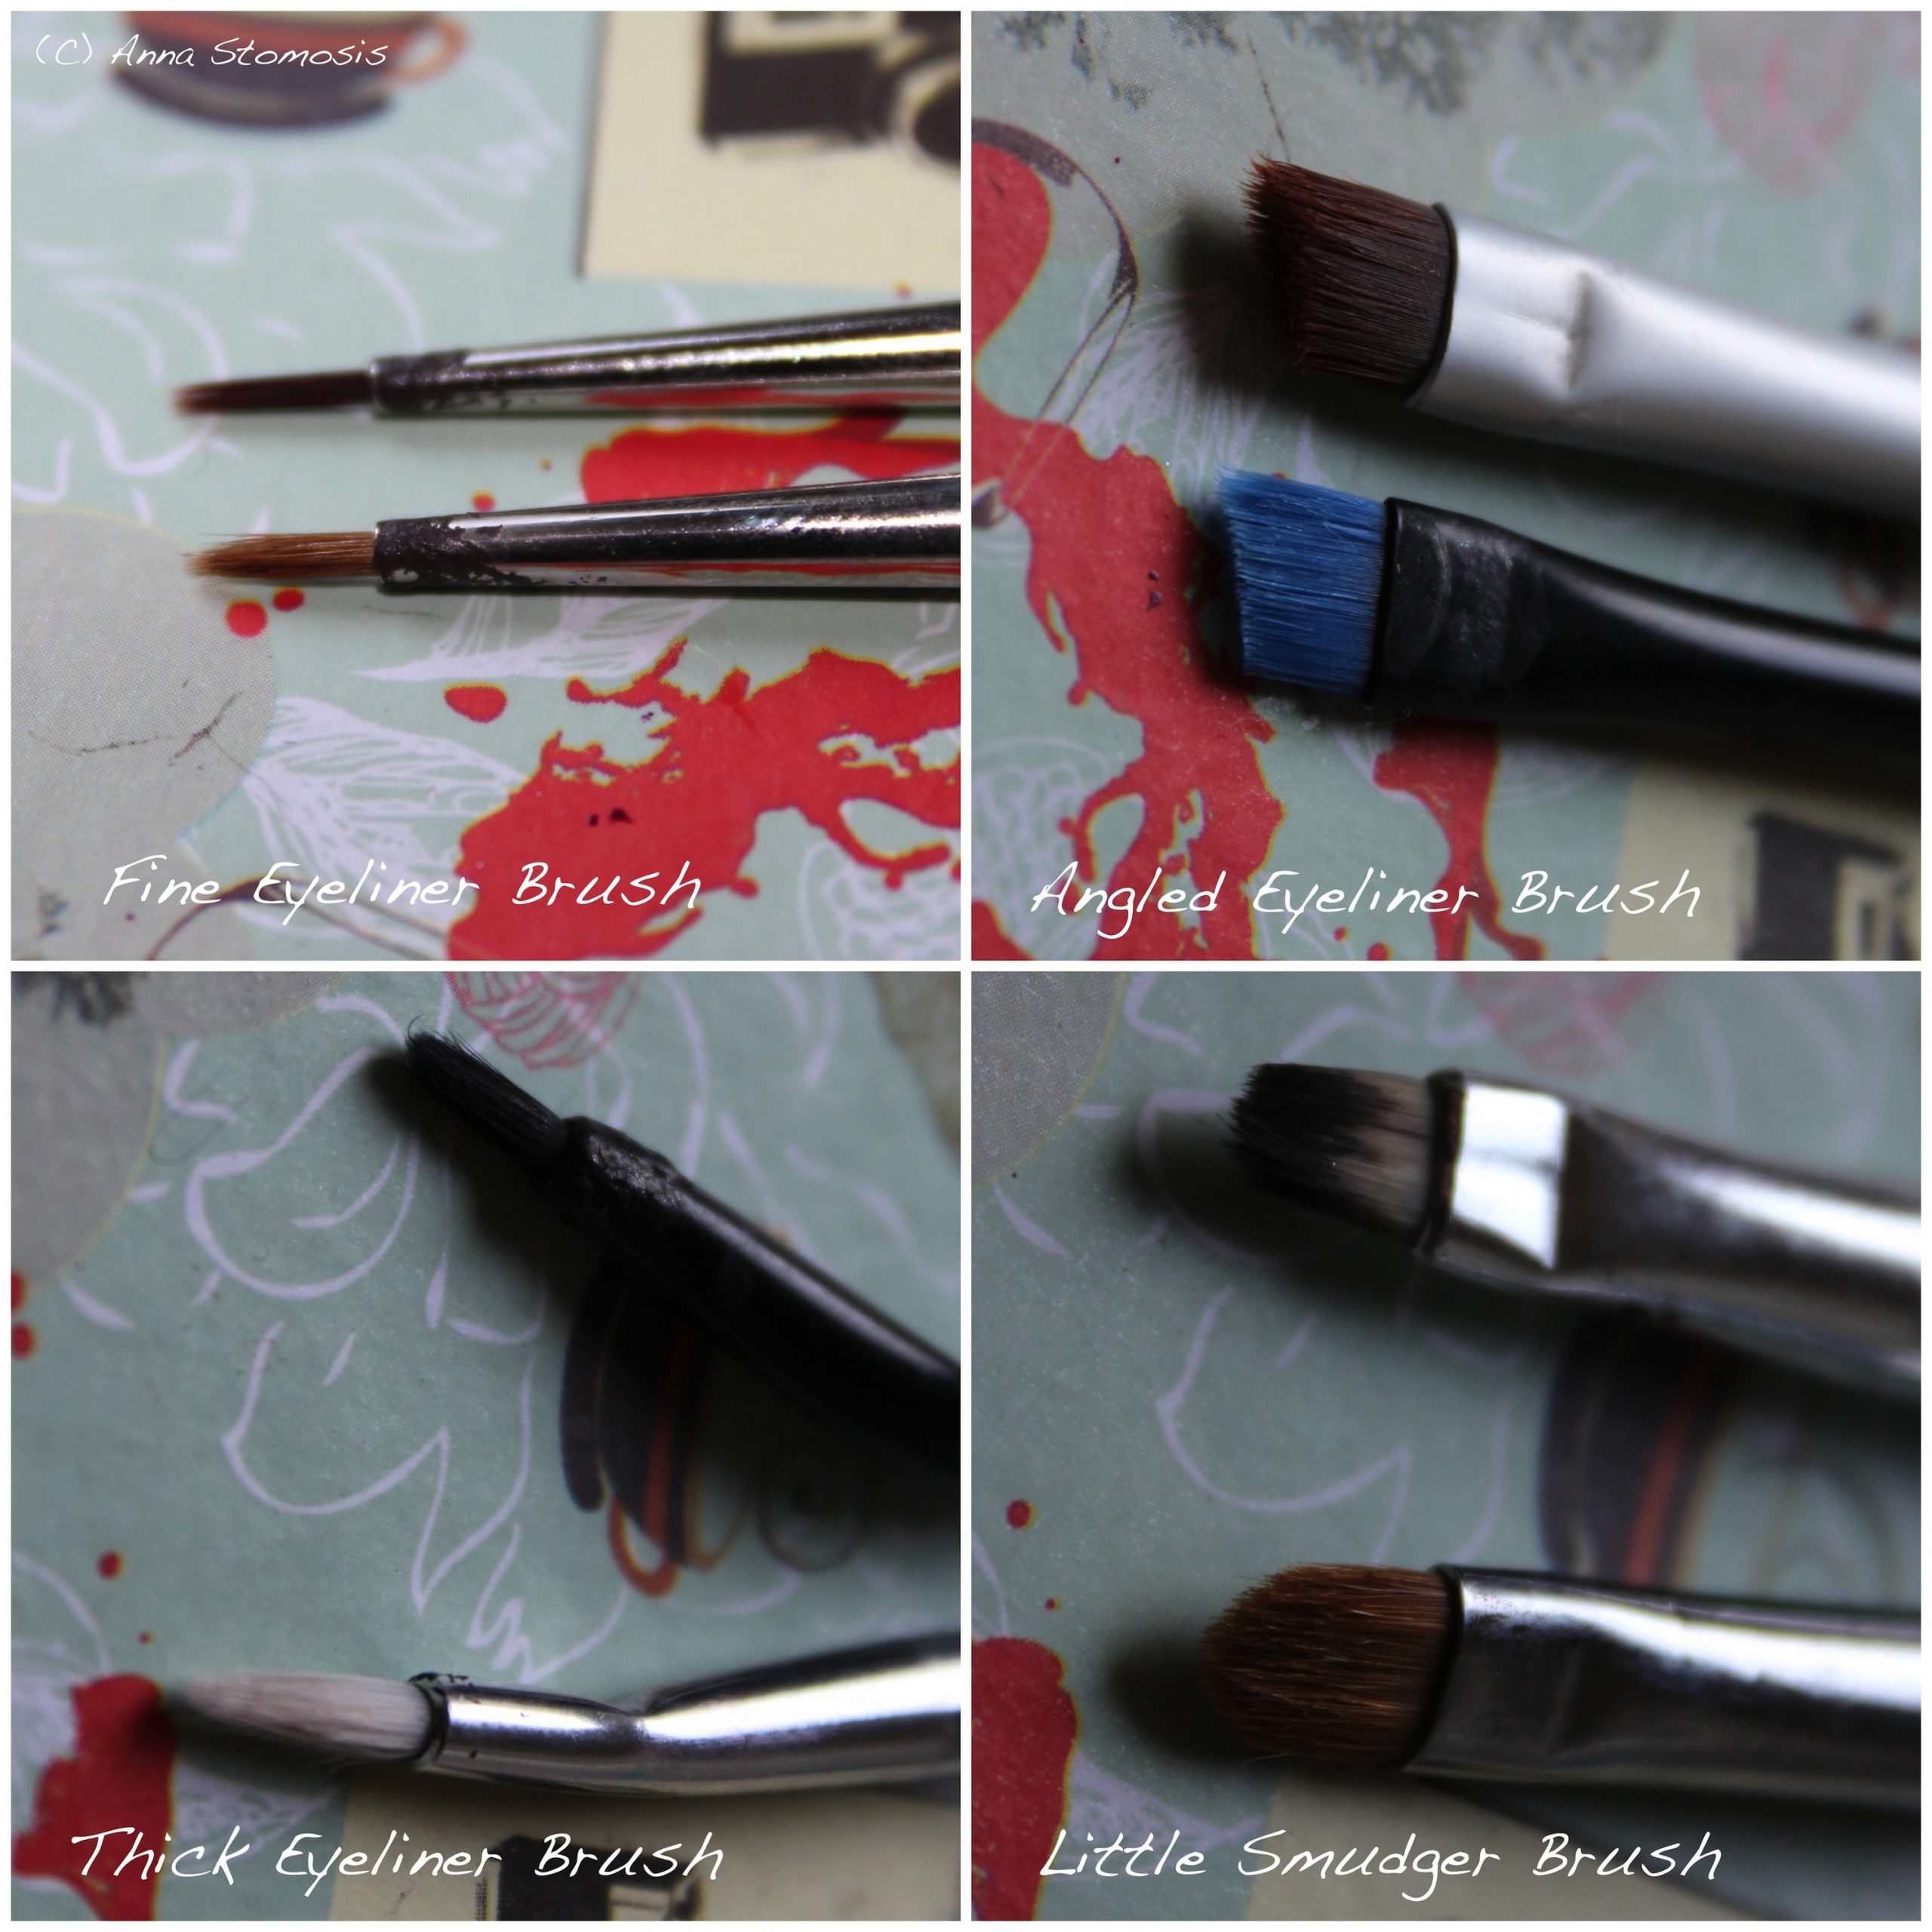
With the fine eyeliner brushes you can achieve a very precise result, but this tool also requires some practice. The angled brush is different - it is also ideal for beginners and achieves a solid result. The thicker eyeliner brushes are for those who want the eyeliner to stand out - precise work is also possible with them, but the result is also wider due to the size of the brush. Finally, the smudger or detail brush - perfect for a smoky eyeliner, for all those who like to conjure up slightly softer contours on the eye.
You can achieve a very precise result with the fine eyeliner brushes, but this tool also requires some practice, unlike the angled brush - which is also ideal for beginners and also achieves a solid result. The thicker eyeliner brushes are for those of you who want the eyeliner to stand out - precise work is also possible with them, but the result is also wider due to the size of the brush. Finally, the smudger or detail brush - perfect for a smoky eyeliner, for all those who like to conjure up slightly softer contours on the eye.
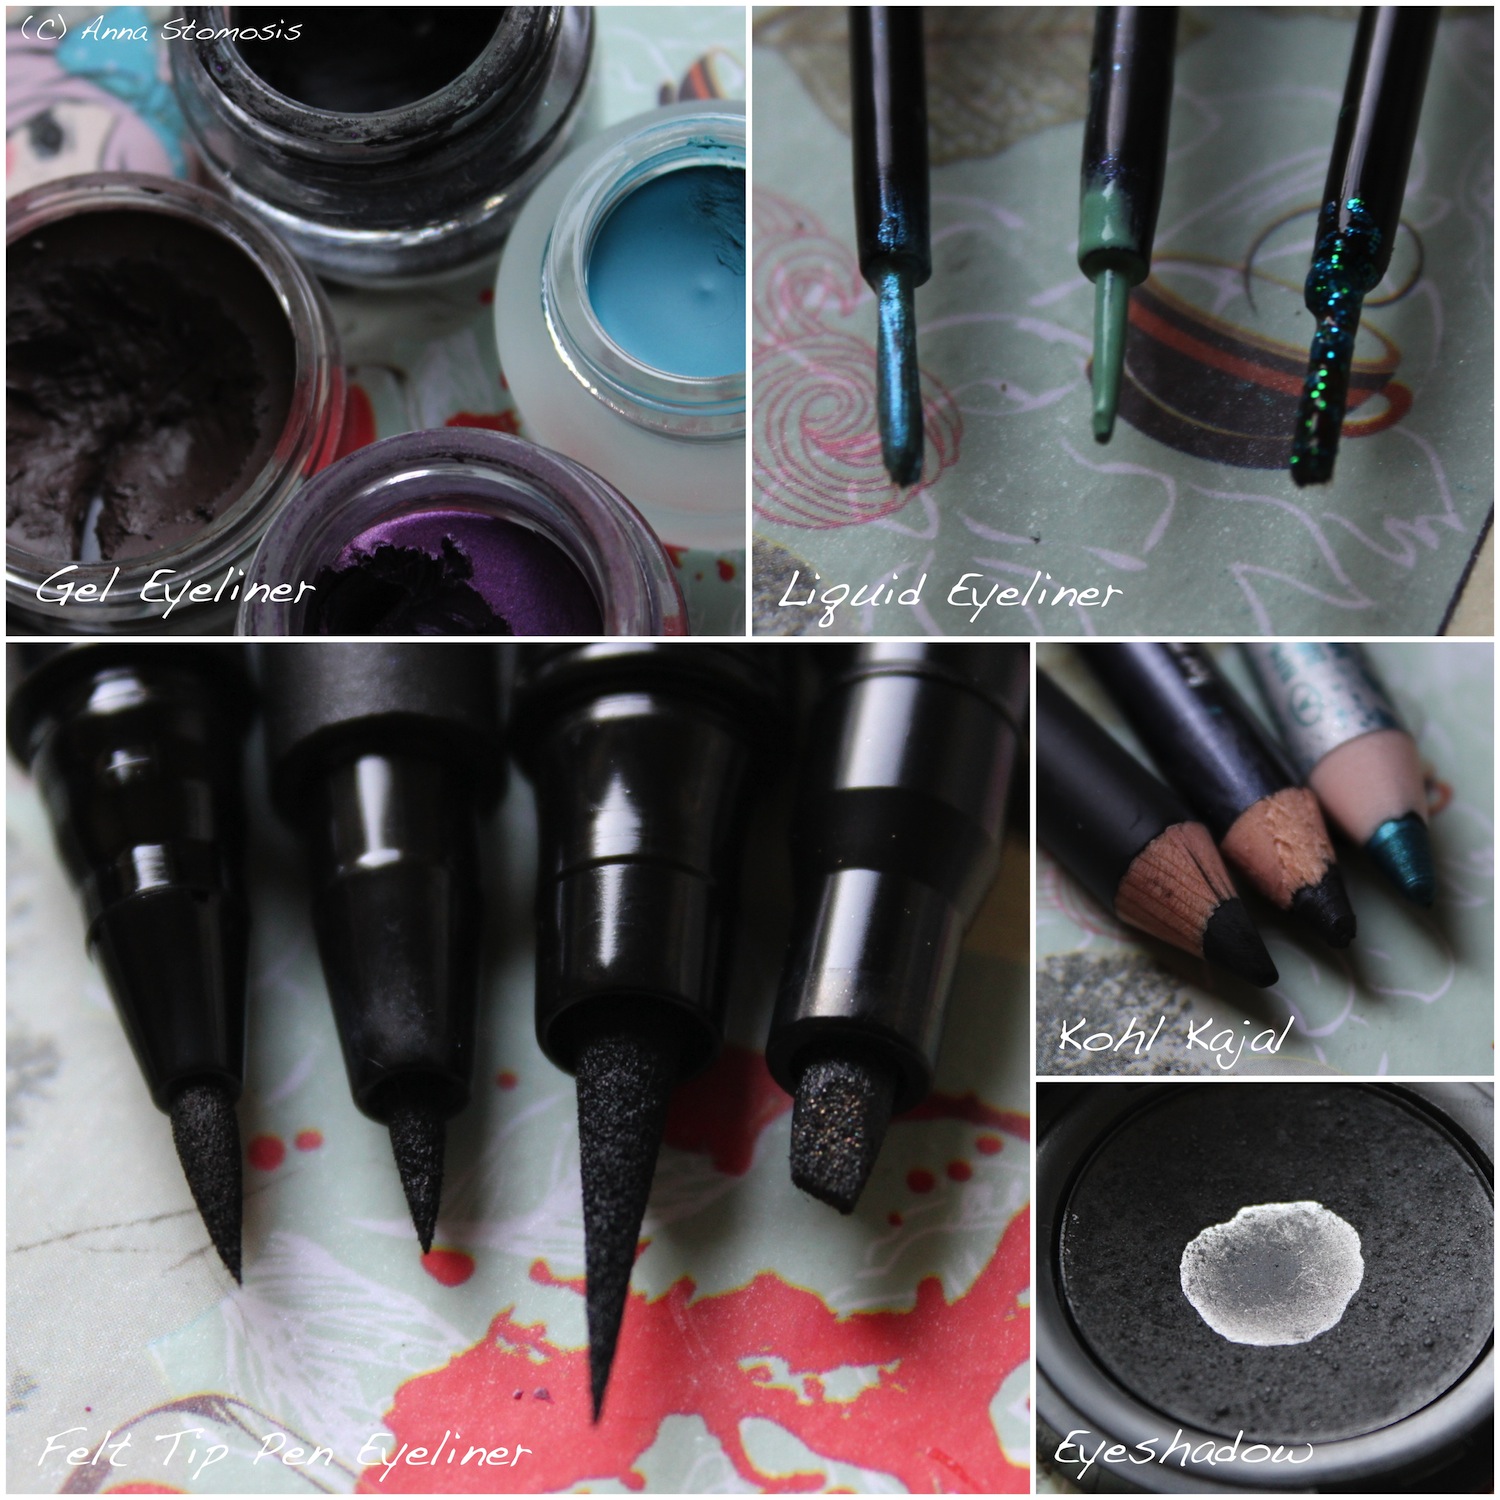
Now it's time to choose the working material: the classic in recent years has definitely become the geley liner. The creamy consistency allows precise work, but also forgives small slips and is easy to correct. This is why gel eyeliner is suitable even for the most novice of beginners.
The next variant is the liquid eyeliner. If you are a beginner, hands off! The liquid consistency is absolutely unforgiving and the brushes of the products are usually not ideal either. You can use a fine eyeliner brush as an alternative here.
The third variant is the felt liner. Available in every conceivable shape, it can be used in many ways and is particularly suitable for very fine eyeliner lines.
Another option is the good old eyeliner pencil. If it is well sharpened, you can use it to draw fine eyelid lines or "smudge" the liner a little for a softer look.
Conventional eyeshadow should also be mentioned here. You can apply it dry and create a soft eyeliner, or moisten the brush to give the eyeshadow more luminosity and also use it for sharp edges.
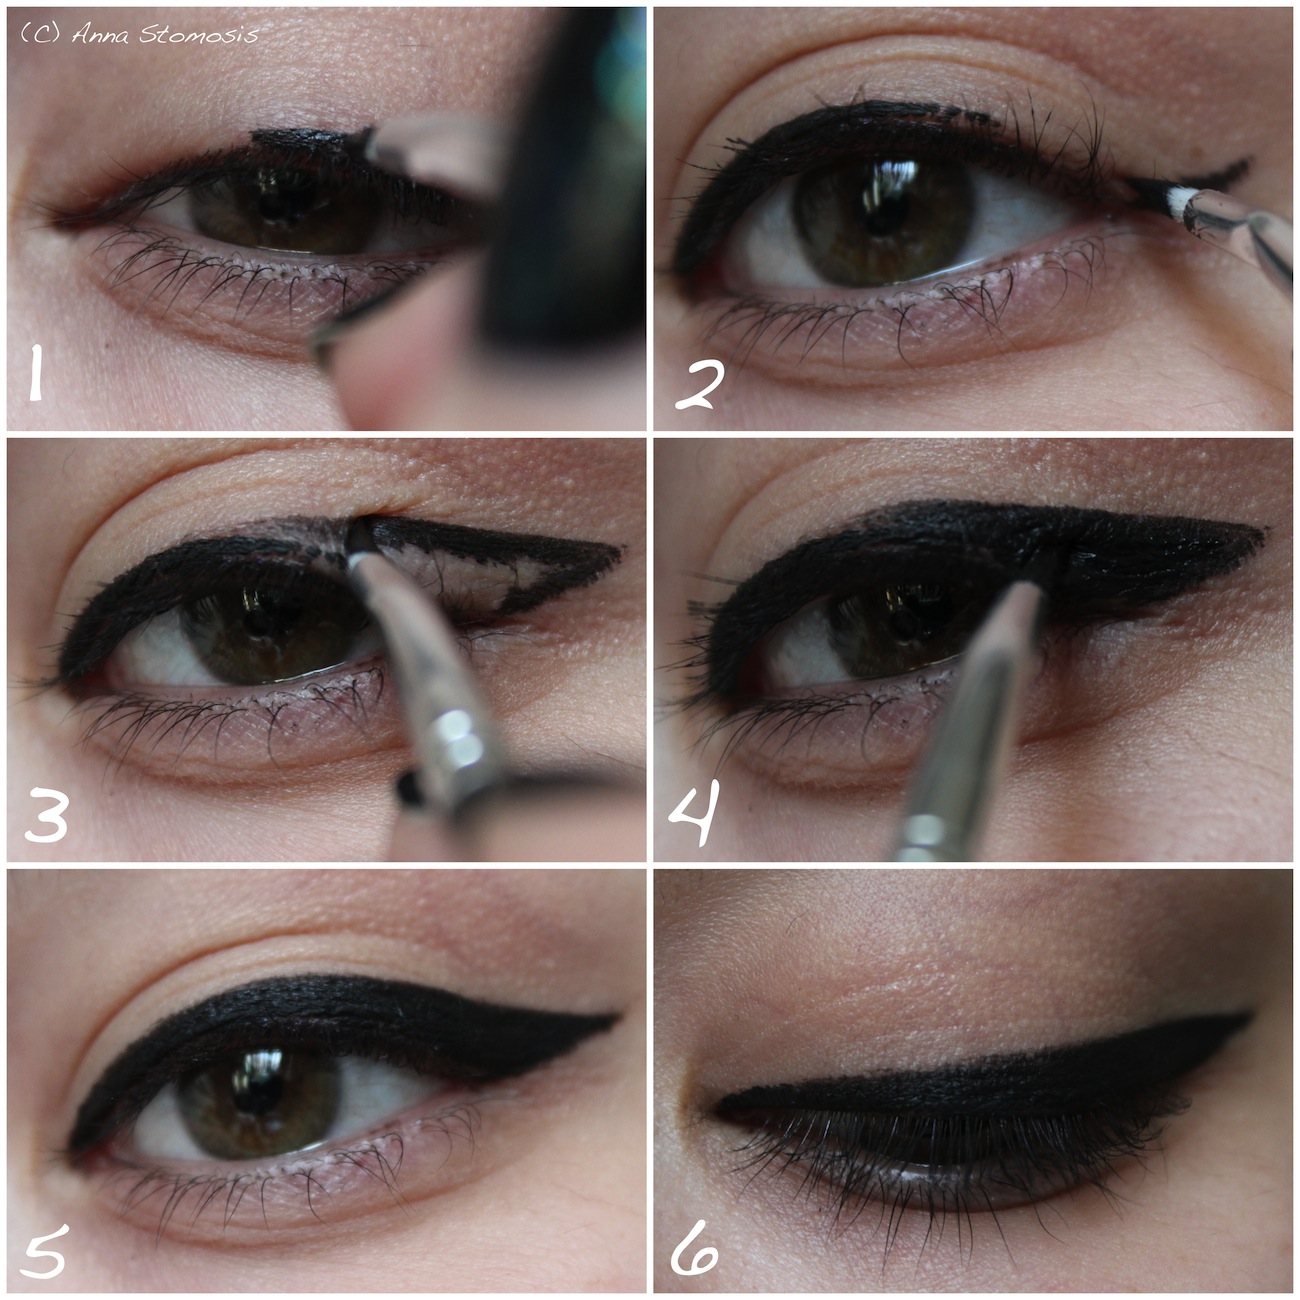
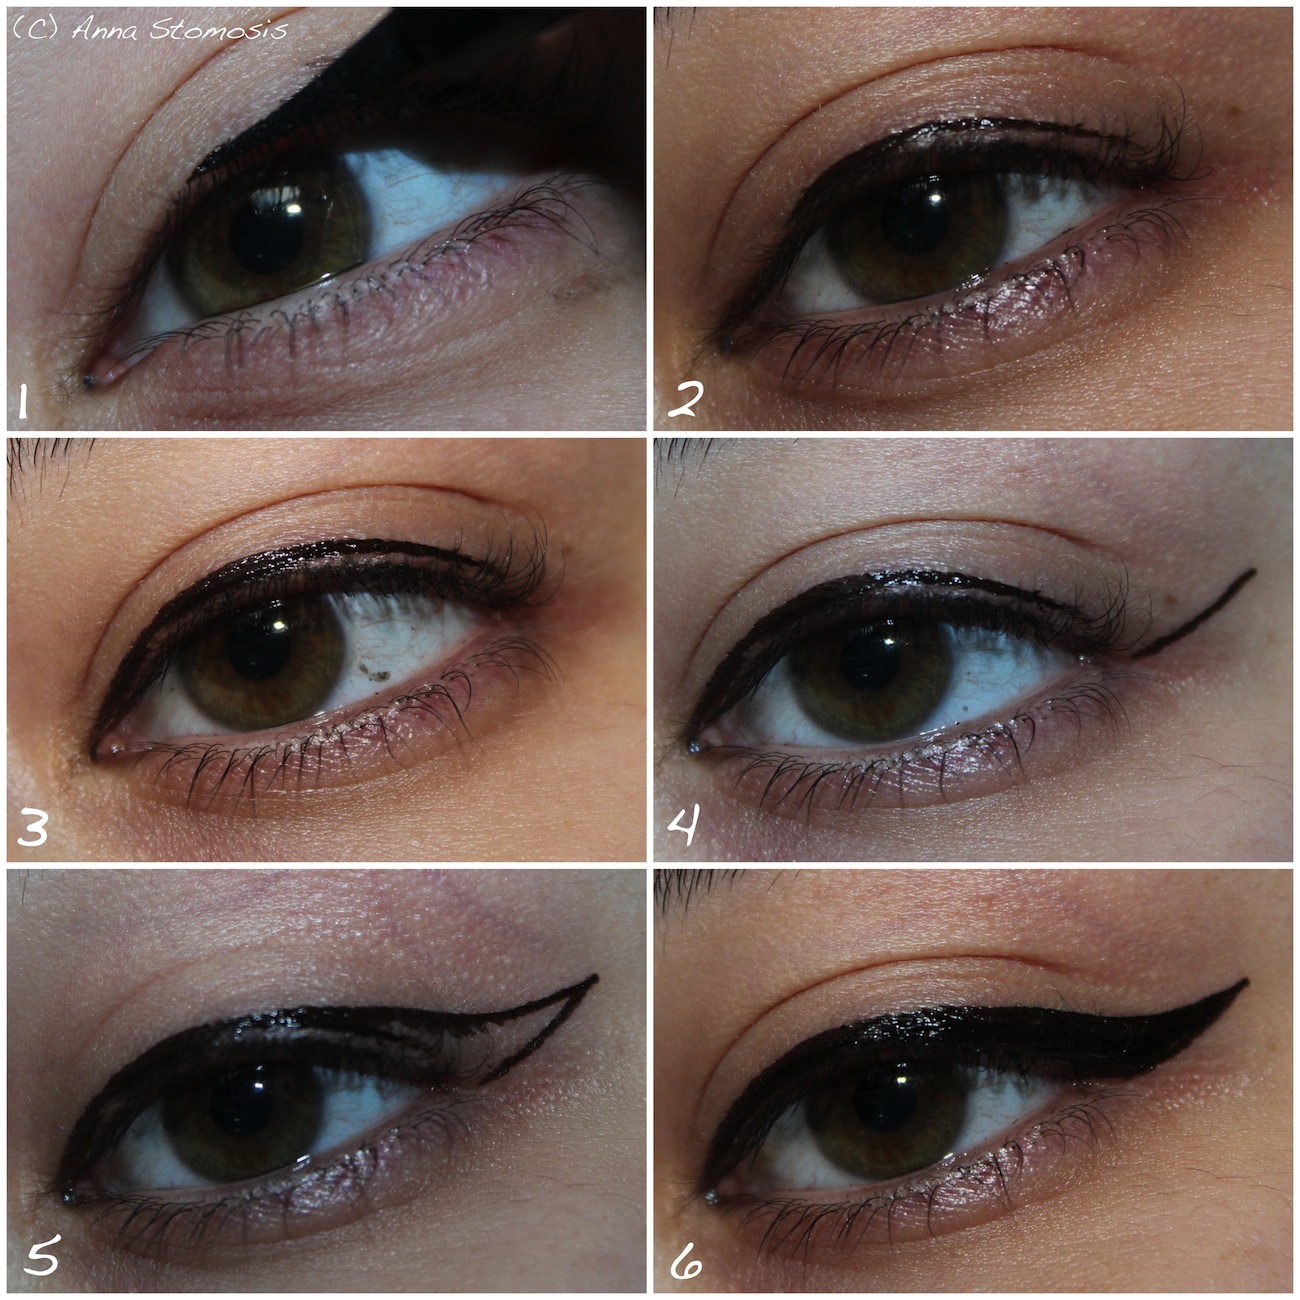
The first combination I would like to show you consists of Geley liner and wide eyeliner brush. You start in the centre of the eyelid and draw your base there (1) - if you apply too thick a line here, it's still no problem to create a beautiful eyeliner. Then apply the tail at the end of the eyelid (2) - just imagine you are lengthening your lower eyelid - this is the easiest way to get the right angle. Now connect the end of the tail with the line drawn in the centre (3). Then simply fill in the resulting triangle (4). If necessary, you can now touch up any small mistakes and your eyeliner is finished (5+6).
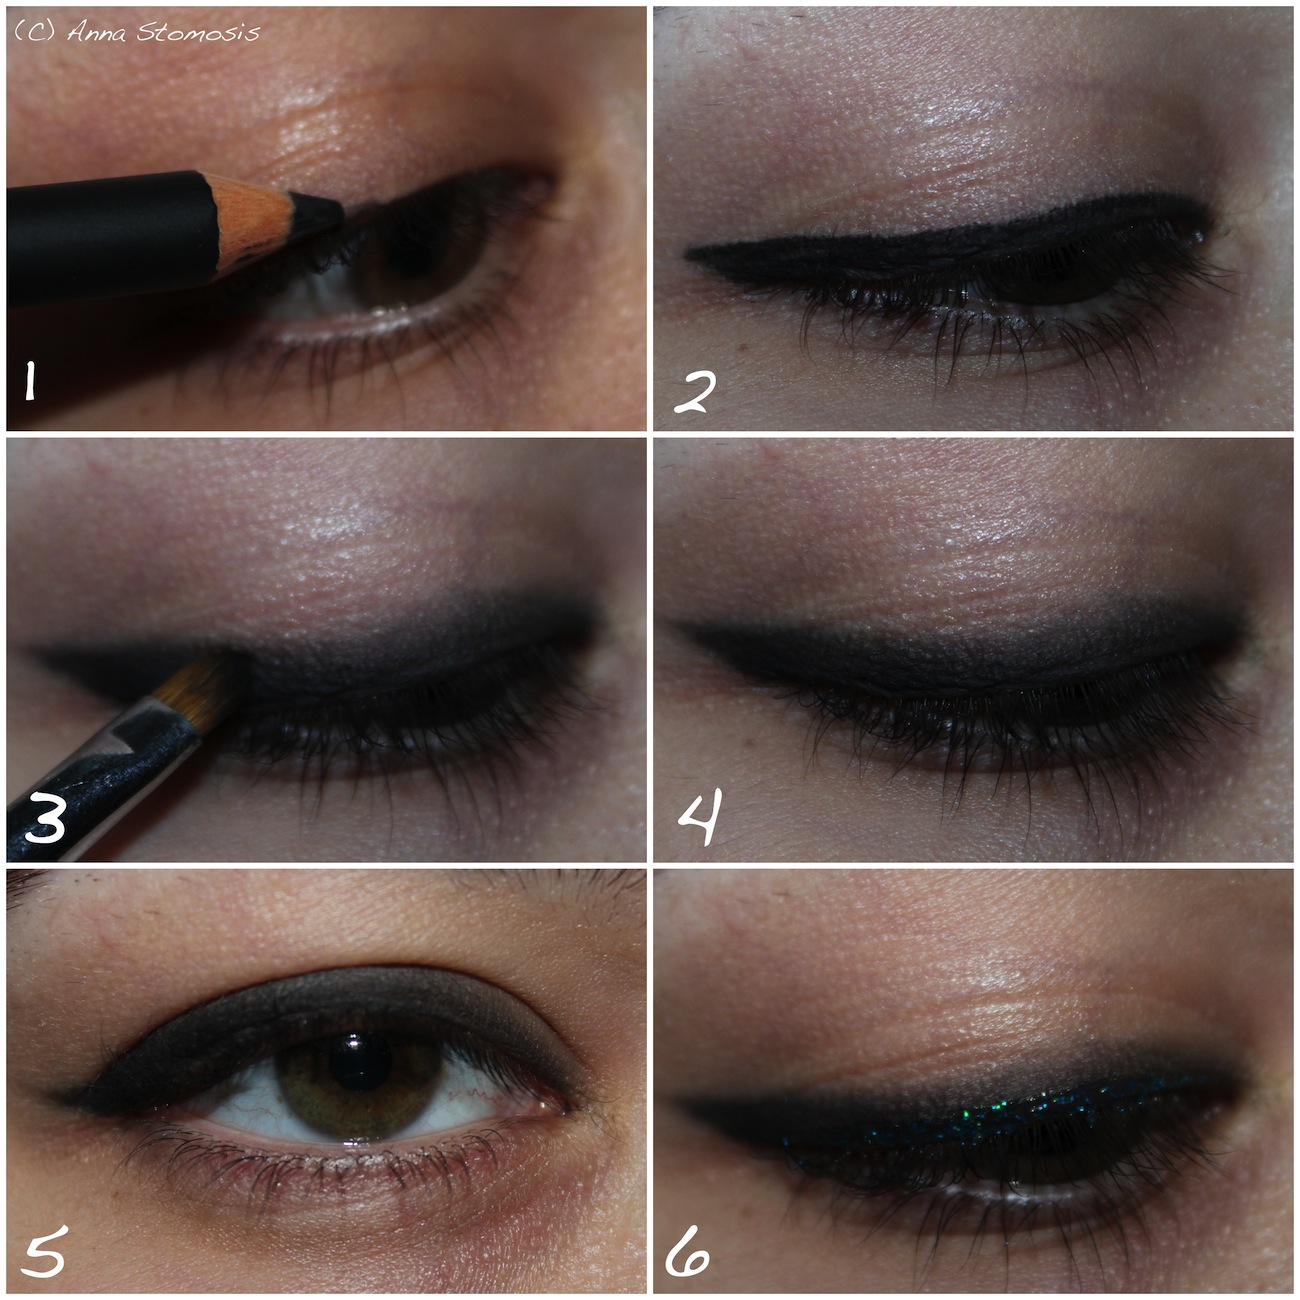
The second variant uses Kajal pencil and smudger brush. To do this, take a well-sharpened eyeliner pencil and draw an eyelid line (1+2) - don't worry, it doesn't have to be perfect and can have its rough edges - they will disappear in the next step anyway. Use the smudger brush to blend the hard edge (3) and achieve a smoky result (4+5). This can also be the base for a glittery liquid liner (6) - an easy way to create great party looks!

All you need for the next eyeliner is a Felt liner. Start again with a fine line in the centre of the eyelid (1), then extend the line to the inner and outer corner of the eye (2) - any gaps are filled in (3). Now draw the tail again (4) and connect the tip of the tail to the centre of the eyelid (5). Fill in everything (6) - and voilà!
A frequently mentioned way to draw a neat eyeliner is to simply draw many small, unconnected lines on the eyelid (1) - place them as close as possible to the lash line, then connect these small lines and dots (2) and you will also get a beautiful and fine eyeliner.
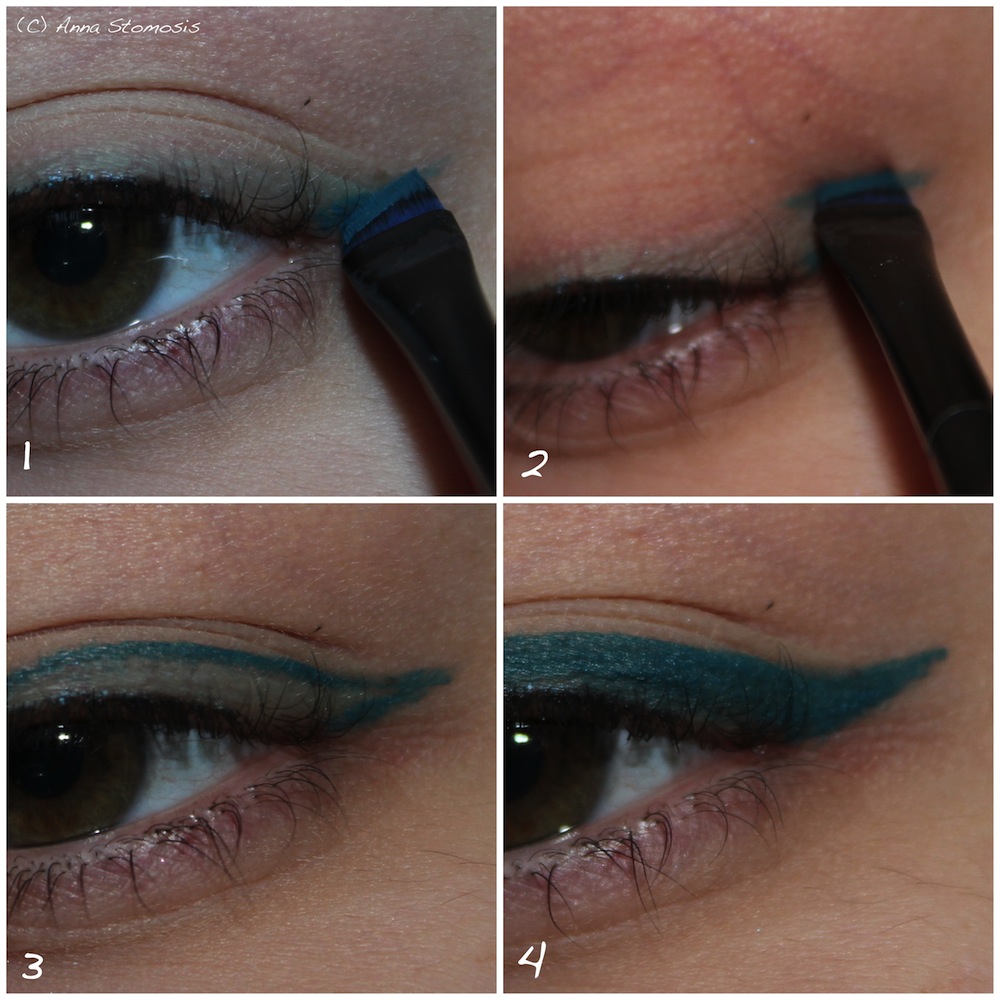
The last option is the combination of Gel eyeliner or eyeshadow and angled brush. To do this, start with the tail (1) - the advantage of the angled brush is that you can simply press on the width of the brush and place the entire wing where you want it. Then start at the tip of the tail and draw the line back to the centre of the lid (2). Now complete the eyeliner up to the inner corner of the eye (3) and fill everything in (4). I've used gel eyeliner here - but you can just as easily use dry or wet eyeshadow and conjure up the rainbow on your eyelids!
I hope I've been able to help some of you and perhaps take away some of the fear of finally trying your hand at eyeliner. Because here too, as always in life, practice makes perfect!